I was not expecting myself to write about this at all when I set out to load a certificate in a Linux NodeJs Azure Function App. My initial thought was that it should be pretty simple, all I need is the path to the certificates. Turns out that most of the documentations I found on the internet only talk about how to do it in Windows using the certificate store instead of Linux. Details are fragmented and are difficult to piece them together. Hence, I am sharing this post to have all the details in one place. Without further ado, let’s look at how to do it.
Prerequisites
First, create a Linux Function App (I used the Basic B1 plan which is the cheapest plan with isolation). Then upload the certificate to the Function App / App Service. This part is well documented by Microsoft, please follow the instruction in the link below:
After uploading the certificate, note the Thumbprint of the certificate from the TLS/SSL settings section. Highlighted in yellow in the screenshot below.
Where are the certificates?
Before the certificate is available to load from the file system, we will need to set WEBSITE_LOAD_CERTIFICATES in the app settings of the Function App. The value is the Thumbprint of the certificate. Multiple thumbprints can be set using a comma separated list. To make available all the certificates uploaded to the Function App use * as the value.
Go to the Configuration section and click on New application setting as highlighted in yellow below. Add the WEBSITE_LOAD_CERTIFICATES setting and its value then click Save.
Once the above step is completed. The certificates will be available from the file system. The file name of the certificate is the thumbprint. Extension is der for public certificate and p12 for private key. Note that the private key does not need a passphrase to load.
Loading the certificate is as simple as loading it from the file system. To show the list of available privates keys in a HTTP trigger Function App, refers the code below:
One might expect to see the certificates using the Bash console in Kudu. However, the /var/ssl folder is completely absent in there. To check if the certificates are there, list them in the Function App using code.
At Microsoft //build/2013, I received an Acer Iconia W3 8″ Tablet. Even back in 2013, the tablet, which come with Windows 8 Home, is under powered and with a TN LCD screen, it is very hard on eyes to use.
Since then I have upgraded it to Windows 10 via the free upgrade and Microsoft finally stop supporting the CPU and therefore unable to upgrade to newer version of Windows 10 except for security update.
Typically, old hardware could be used to run a more lightweight Linux. However, this CPU is 32-bit and has all sort of compatibility problems with Linux. Not giving up the hardware which come with a battery, consume little power and fanless. I have decided to turn it into a server for fun.
Why NodeJs?
NodeJs is lightweight, support Win32, easy to code and find libraries and frameworks. Besides, using .NET Core on Windows platform is not that challenging.
Azure App Service = IIS + Kudu + magic
I have been using Azure since inception when the Cloud and Storage services were still in beta. Nowadays, we have Azure App Service. One of the feature it offer is to use git to deploy code. Which make deployment very simple when building proof of concept.
Under the hood, App Service Windows Platform is powered by IIS and Kudu plus some infrastructure automation magic. I am going to go through how to setup both and some manual infrastructure configuration to make our own app service all on a Win32 tablet.
Installing NodeJs and git for Windows
Since I am trying to setup a Win32 tablet, I need to download the 32-bit version of NodeJs and git for Windows.
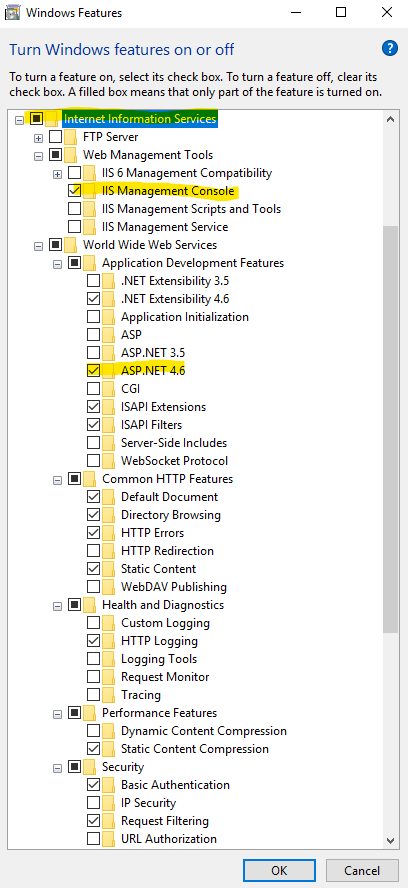
Start -> Search for Windows feature -> Click Turn Windows features on and off -> Click Internet Information Services -> Make sure Application Development Features\ASP.NET is also selected -> Click OK to start installation
After IIS is installed we will need to download and install a couple of IIS modules:
The reason to install Visual Studio is to make sure all the relevant target files which required by Kudu are installed correctly and setting up path for commands. I believe we can get away with installing the build tools and the target packages only. But since this is a home project, it is easier to just install Visual Studio.
Open the downloaded zip file and follow the steps below:
Copy KuduWeb to C:\inetpub and create App_Data folder in KuduWeb.
Right click on KuduWeb -> Properties -> Security tab -> Edit permission -> AddIIS_IUSRS with Read & execute, List folder contents and Read permission
Open IIS manager, create a new application pool called KuduWeb then edit the Advanced Settings and change Identity to LocalSystem so that Kudu can manage IIS
Create a new website calling KuduWeb selecting KuduWeb as application pool and set to path the C:\inetpub\KuduWeb. Set a port number of your choice. See the screenshot below.
Copy SiteExtensions\Kudu to C:\inetpub and rename it to Kudu.Services.Web
Create a new folder apps in C:\inetpub and set Users group with full access permission to C:\inetpub\apps which is where new sites are created by Kudu.
You may choose to copy contents of KuduWeb folder directly into wwwroot and skip step 2-4 above. That means Kudu will be installed on the IIS Default Web Site, however you will still need to change the Identity of the DefaultAppPool to use LocalSystem. The reason to create a separated website is to allow me to use the default web site as a reverse proxy later.
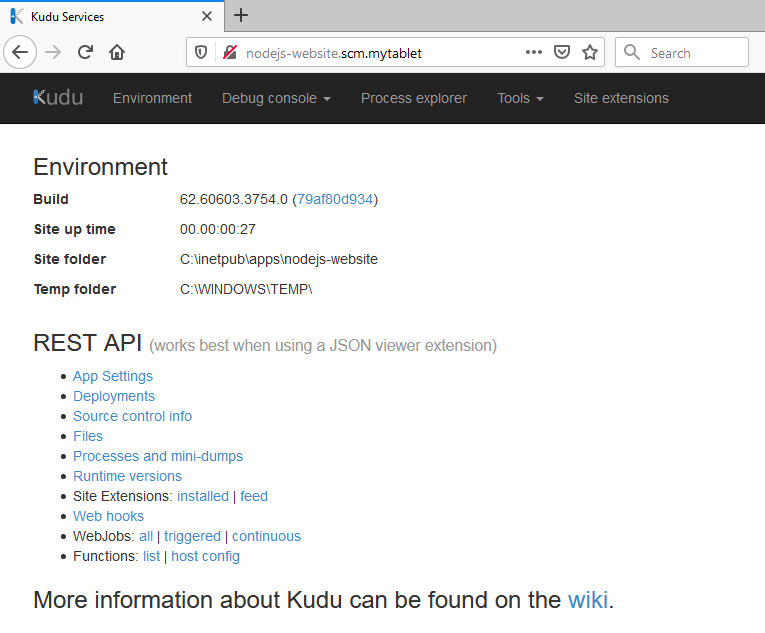
Open browser and go to http://localhost:38380 (where 38380 is your Kudu port number) will open the Kudu Dashboard. Click Admin at the top right corner and verify the setup is done correctly.
Creating new website using Kudu
On Kudu Dashboard, click Create Application and enter the name of the website and click the Create application button. Kudu will generate a SCM and application website using a randomly generated port number.
Setting up Reverse Proxy
Now the SCM and website are created, however they are protected by firewall and it is not accessible outside of localhost.
In IIS Manager open Default Web site -> Under IIS section open URL Rewrite -> Right click and Add Rule(s)... -> Select Reverse Proxy
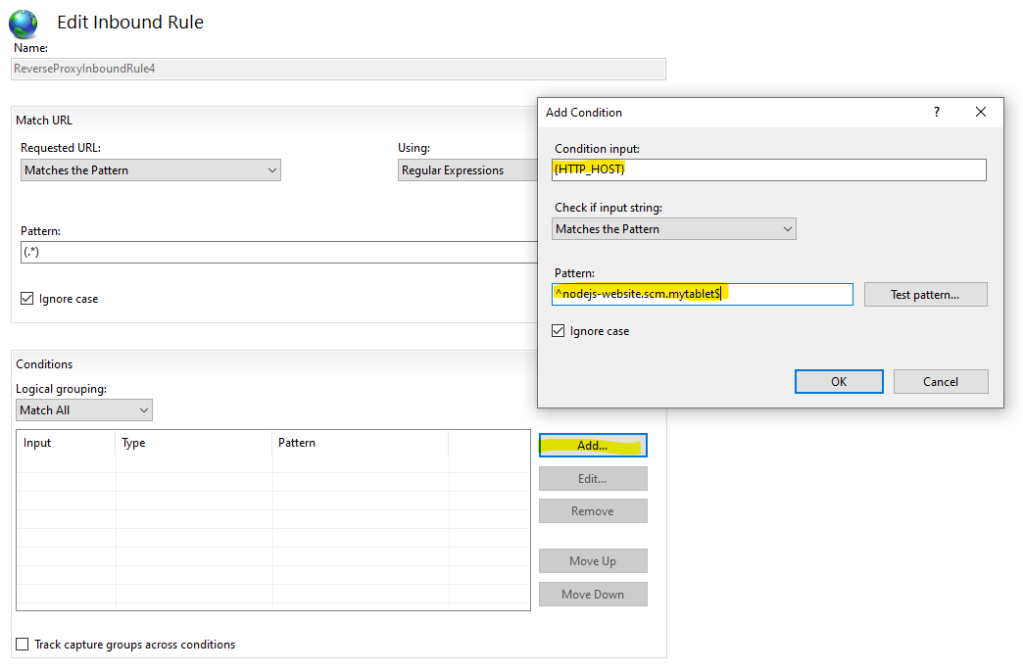
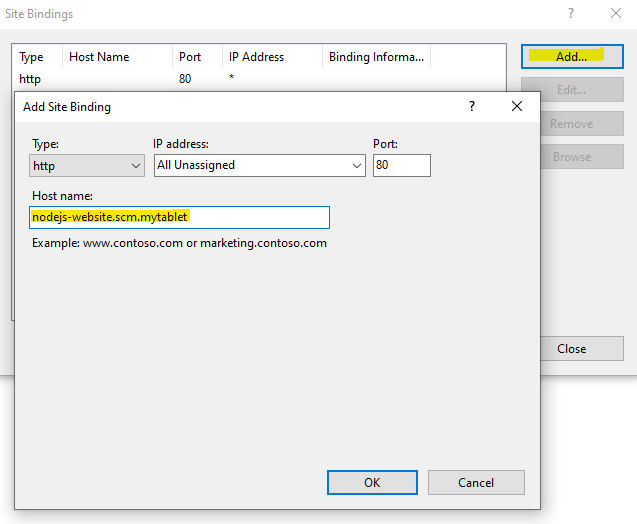
Create a rule for the SCM of the new website using the details above. Service URLlocalhost:23669. Note that, I also have an outbound rule to rewrite domain names of links in HTTP responses. In this case I use nodejs-website.scm.mytablet as the domain name.
Double click to edit the new rule and add a condition which check the host name with a regular expression pattern.
Condition Input: {HTTP_HOST}
Patterns: ^nodejs-website.scm.mytablet$
Click OK then Apply on the right in IIS manager
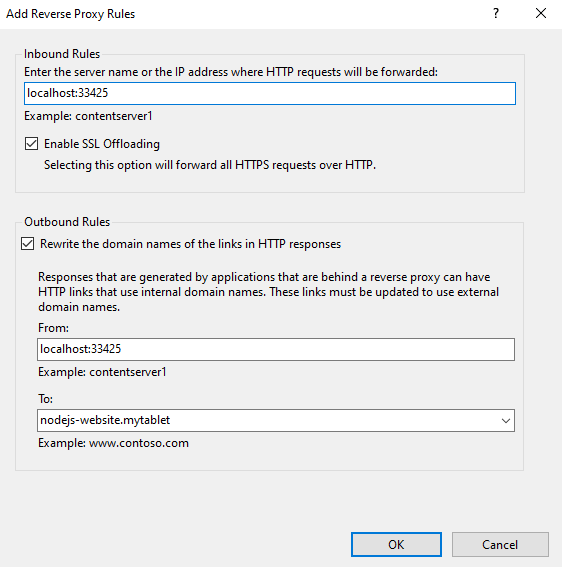
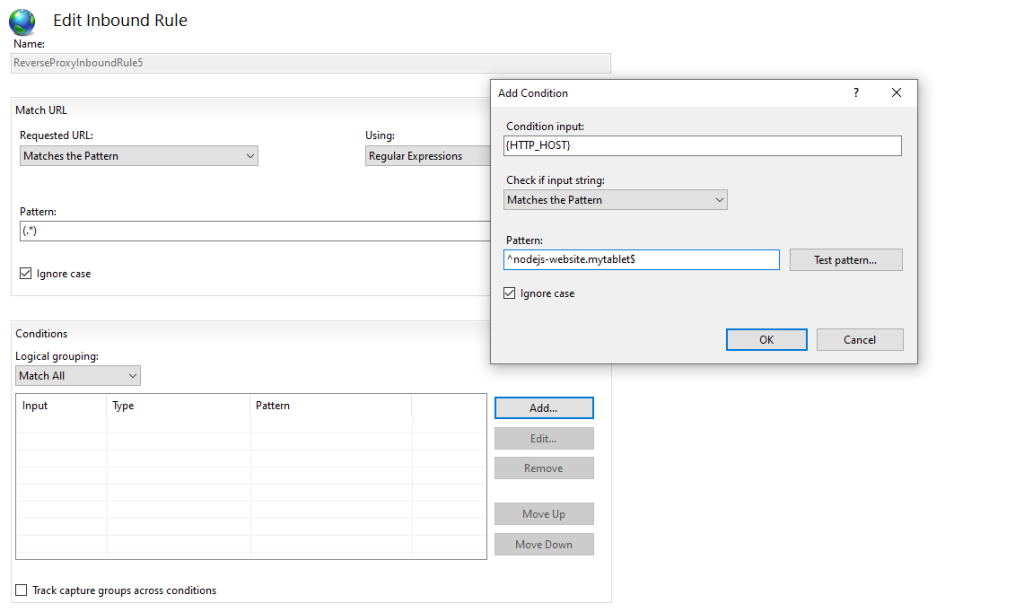
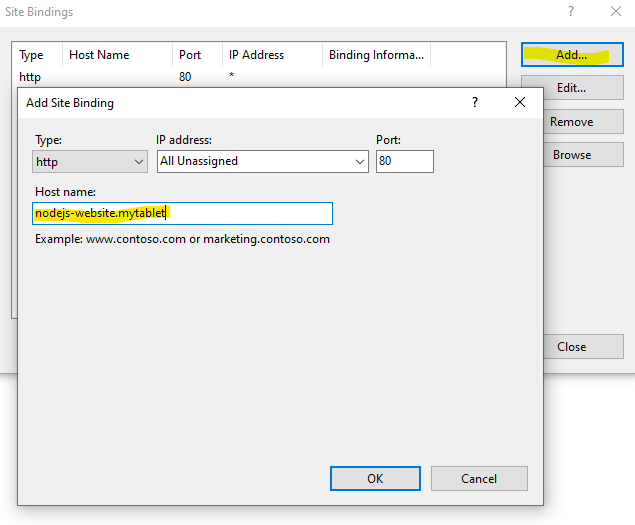
Follow the same instruction to create a new rule for the application website. Application URLlocalhost:33425 and rewrite the domain name to nodejs-website.mytablet. Make sure you also add a condition to the rule using ^nodejs-website.mytablet$
Edit Bindings of the Default Web Site and add two bindings. One for the SCM and one for the application.
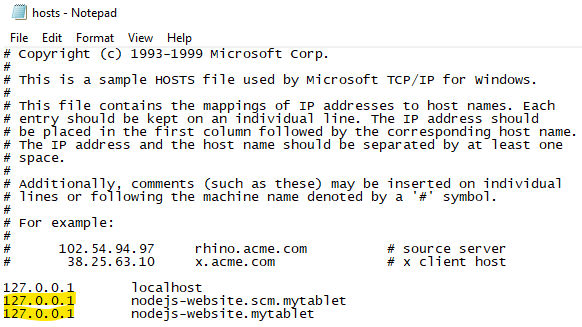
Now add these two domains into your hosts file or DNS server pointing to the IP of the server. Then you may access the SCM via http://nodejs-website.scm.mytablet. Check firewall rule if that does not work. TCP Port 80 need to accept inbound request.
Deploy NodeJs website with git
Now with the above Reverse Proxy setup. The GIT URL can be access outside of the machine via HTTP port 80 on http://localhost:23669/nodejs-website.githttp://nodejs-website.scm.mytablet/nodejs-website.git
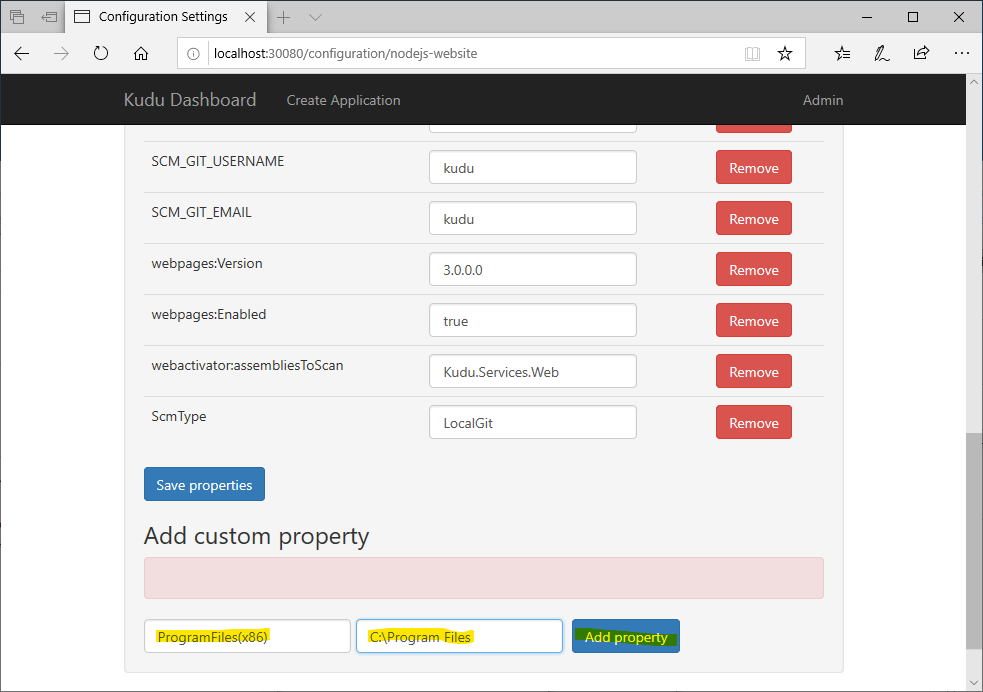
However, there are some quirks with Win32 and Kudu which will cause error when deploying NodeJs application. Win32 does not have C:\Program Files (x86) folder, however Kudu is expecting a ProgramFiles(x86) environment variable pointing to C:\Program Files (x86). To work around this, go to the Configuration of the nodejs-website and add a custom property ProgramFiles(x86) pointing it to C:\Program Files. This will allow the deployment to go through.
When Kudu create a new application, it will create a new user profile to go with the new application pool which it created for the application website. However the user profile location is not set correctly which will cause npm install to fail. Add the following custom properties to get around this problem. Note that, in this example, nodejs-website is the user profile created by Kudu.
Property name
Property value
USERPROFILE
C:\Users\nodejs-website
APPDATA
C:\Users\nodejs-website\AppData\Roaming
LOCALAPPDATA
C:\Users\nodejs-website\AppData\Local
After adding the above custom properties, we are ready to deploy the application.
For details on how to create a NodeJs website, there are many different frameworks and ways to do so. I am going to skip the details. However, I am using koa in this example.
Create server.js with the following code and commit it to master branch. iisnode will run server.js automatically after the deployment. iisnode will provide a PORT via environment variable for NodeJs HTTP server to listen to. Hence, the code to start the server is written this way app.listen(process.env.PORT || 3000);
const Koa = require('koa');
const app = new Koa();

app.use(async ctx => {
  ctx.body = 'Hello World from NodeJs website';
});

app.listen(process.env.PORT || 3000);
Now create a new remote for the git deployment. Let’s call it deploy and using the example above run this git command:
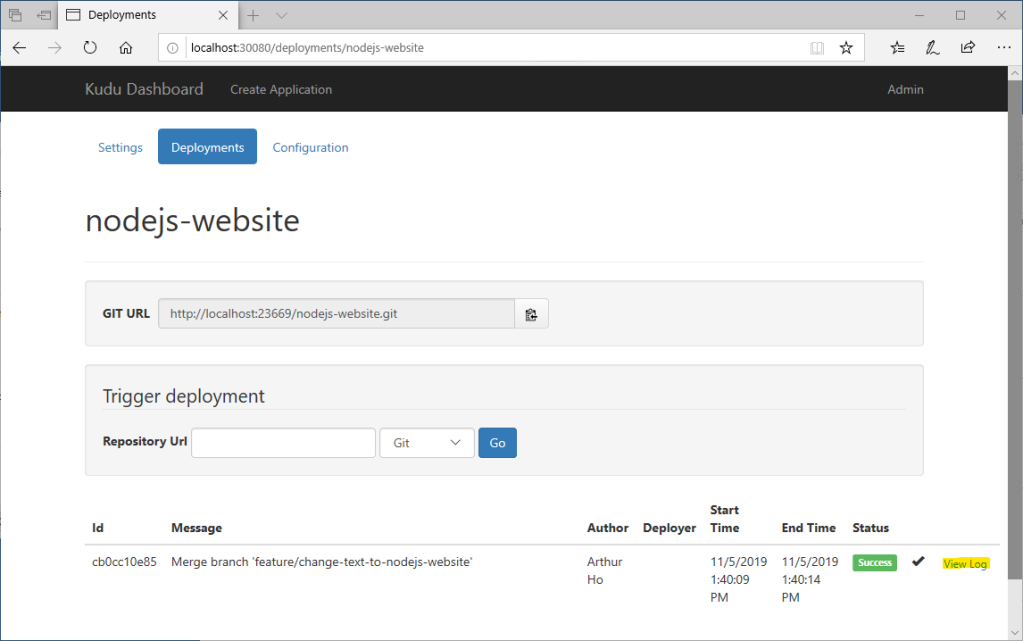
We should see a series of output prefixing with remote which shows the things happening during the deployment. After the git command is finished. Let’s check out the Deployments of nodejs-website on Kudu. Click View Log to review the deployment logs for debugging.
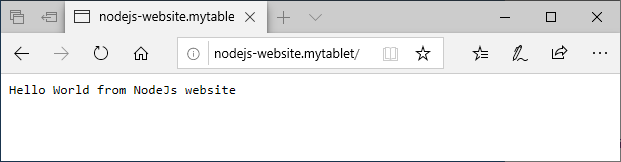
Now the NodeJs application is deployed, we can hit the site using the domain which we setup earlier. Open the browser and go to http://nodejs-website.mytablet/
That’s it! Now, I have my own version of app service running on an old Win32 tablet. We can further secure the site by adding authentication and HTTPS.
Conclusion
We have seen how to install Kudu and its dependencies such as IIS, NodeJs and git. We have also take the extra step to setup a reverse proxy and additional bindings to allow the server to serve different websites via different host name. We have also work around some quirks around Win32 and Kudu. Finally, we have deployed the NodeJs application to the server with git.
Next, I wonder if I could host the function app runtime in there too. It is a project for another day 🙂
The SAFE stack 1.0 had been released for about two months now. I am looking at the different between 1.0 compared to the older version which one of the project I am working on is using. The best way to learn about it – is to try to upgrade the project to match what’s in version 1.0.
Upgrade Challenges
Fable.Core and Fable.Elmish 2 -> 3
The biggest change I see is the major version change of the Fable.Core and Fable.Elmish packages. These major version upgrade come with namespace / module reorganization and splitting some packages into smaller packages. Notable changes I see are:
Elmish.Browser.Navigation -> Elmish.Navigation
Elmish.Browser.UrlParser -> Elmish.UrlParser
There are some minor breaking change but they can be resolve pretty easily with a couple of minutes of googling.
Fable.React 4 -> 5
Similar to other packages, there are changes in namespace / module reorganization:
As of the time of writing Fable.Fetch actually commented out function like fetchAs in the source code. As a result, I decided to replace fetchAs with Thoth.Fetch which under the hood still use Fable.Fetch. But Thoth.Fetch come with the ability to deserialize the response using Thoth and tryFetchAs function to return a F# Results directly which make Railway Oriented Programming much easier.
However, there are some quirks to use Thoth.Fetch. When opening the module we need to open Fable.Fetch too. Below is the code snippet to do so correctly.
open Fetch
open Thoth.Fetch
Elmish Cmd changes
The Cmd in Elmish also come with “breaking” change. Cmd.ofPromise is now Cmd.OfPromise.either. The reason why breaking is quoted is because there is actually an upgrade path using just a slightly different API on Cmd and it is also documented very clearly. However, the catch is that the new API is hidden behind a compiler constant called FABLE_COMPILER. If the existing client side project does not already have this FABLE_COMPILER constant setup in the project file. The new API is not available to use. So a manual editing of the client side fsproj file is needed to add FABLE_COMPILER to it. You may add that like below:
If running into problem trying to build the project after upgrading to SAFE stack 1.0. Try deleting the .fable and .fake folder and rebuild from a clean slate.
I have been doing a fair bit of Isomorphic F# with the team recently and keen to try out the Anonymous Record Type in F# 4.6. While everything worked well in a development environment after implementing anonymous records, the Azure DevOps continuous integration failed to compile. It was not able to recognize the new syntax.
At the time of writing, the FSharp.Compiler.Tools have not been updated with F# 4.6 support yet. As a result, embedding the compiler in the project is not an option.
In order to build F# 4.6 we need .NET Core 2.2. Luckily, Azure DevOps’ build definition is a YAML file and it is easy to change and source control. In this case, with a Microsoft hosted build agent. First make sure the build VM image is windows-2019. In the YAML file, setup the VM image like this:
pool:
  vmImage: 'windows-2019'
Then make sure the .NET Core version is 2.2. Simply add a task as the first step to use a specific version of .NET:
This is not really a news any more as it’s been reported around the web already. But I cannot help but to blog about it 🙂
You can download Windows 8 preview download from the below link. NOTE: this is a developer preview pre-beta. You might only perform clean install with it. Regular user should stay away from it until the beta release.
Interesting, the developer preview ISO also come with Visual Studio 11 Express. So you might also be able to check out a few Visual Studio vNext features. If you would like to learn more about vNext, you can check out the recording of one of the session from TechEd 2011 Australia (see link below).
While trying to help my colleague today to set and test permission on an object in SQL Azure. I received ‘Deprecated feature ‘SETUSER’ is not supported in this version of SQL Server.‘ error. A quick google search revealed that there are a number of security functions not available in SQL Azure. The full list is available here.
To perform action as another user, instead of using ‘SETUSER’ you can use ‘EXECUTE AS‘ clause. Below is an example I copy from MSDN.
USE AdventureWorks2008R2;
GO
CREATE PROCEDURE HumanResources.uspEmployeesInDepartment
@DeptValue int
WITH EXECUTE AS OWNER
AS
SET NOCOUNT ON;
SELECT e.BusinessEntityID, c.LastName, c.FirstName, e.JobTitle
FROM Person.Person AS c
INNER JOIN HumanResources.Employee AS e
ON c.BusinessEntityID = e.BusinessEntityID
INNER JOIN HumanResources.EmployeeDepartmentHistory AS edh
ON e.BusinessEntityID = edh.BusinessEntityID
WHERE edh.DepartmentID = @DeptValue
ORDER BY c.LastName, c.FirstName;
GO

-- Execute the stored procedure by specifying department 5.
EXECUTE HumanResources.uspEmployeesInDepartment 5;
GO
You can also find a list of deprecated database engine features in SQL Server 2008 R2 here.
Not too far into creating a simple proof of concept utility with XML-RPC.NET. I stumbled across this old post about AtomPub support in Windows Live Writer. Since AtomPub is relatively new compared to MetaWeblog API, I decided to use AtomPub to future proof my work.
Very soon I discovered that tagging a post is not a concept existed in Atom. After some research on the Internet, I found a great article about representing tags in Atom. However, unlike the article suggested, WordPress at the time of writing still does not support tagging with AtomPub. The issue ticket is marked as future release. It is still hopeful that future version of WordPress would allow that, but at this stage, AtomPub is not better than MetaWeblog API when working with WordPress.
MetaWeblog API and SharePoint Blog
My journey continued with the MetaWeblog API, with the help of some great documentation of MetaWeblog API here, I made great progress. Then out of curiosity I decided to try to post to a SharePoint Blog as SharePoint support MetaWeblog API for it’s blogging feature as well.
Different authentication model
Normally, the user name and password is submitted as a parameter of the call. However, with SharePoint, it will greet you with an error message ‘The server is not configured to accept user names and passwords as parameters.‘. To resolve this, the credential need to be pass in with the actual HTTP request. With XML-RPC.NET, it can be done like this:
var credential = new NetworkCredential(userName, password, domain);
var sharePointBlogProxy = XmlRpcProxyGen.Create<ISharePointMetaWeblog>();
sharePointBlogProxy.Credentials = credential;
Then on the method call, pass in string.Empty as the user name and password.
Blog API enclosures are unsupported
Enclosures are not supported in the SharePoint MetaWeblog API. If the XML RPC call included the enclosure element in the XML. SharePoint will throw an error. To work around this, I removed the enclosure property from the data model so that XML-RPC.NET will not include the element when generating the XML request.
Now the application is able to work with both WordPress and SharePoint blogs. This is as far as I go with posting to blog with .NET at the moment. When I have opportunity to press on further with the development I would post new findings here.
As a follow up of my previous posts about posting with MetaWeblog API and AtomPub with .NET. I hope this post would be a place you can find most information you need to get started.
My quest to posting with .NET began with a requirement at work to build something to post to a WordPress blog. The first thing I found after a bit of search is the WordPress Web Service plugin. However the plugin does not help me, it is a plugin for self hosted version of WordPress available from wordpress.org. I need something more generic.
MetaWeblog and WordPress API
After a bit more research, I found that WordPress support MetaWeblog by default and has its own extension on top of it called WordPress API. MetaWeblog is base on XML-RPC, a form of XML based remote procedure call before being develop into more mature standard like SOAP. Since it is using HTTP, it is very easily to use. In fact, I used fiddler to craft the request to check if the API is working before actually start coding the application.
XML-RPC.NET
Once started coding, having to type all the XML data model myself quickly becomes a challenge. I started researching again and quickly found XML-RPC.NET which is an open source library for XML-RPC in .NET. The source code included a few popular blogging API interface, which basically mean that almost everything is done!
Wait, but where is the compiled assembly? CookComputing.XmlRpcV2.dll is missing in the zip package. If you arrive here searching for where is CookComputing.XmlRpcV2.dll, you came to the right place. The DLL is actually in the zip package. However it is zipped with the path .\bin. Tool like Windows Explorer is not able to unzip files like that. Use 7-Zip to unzip the package again and you will see the bin directory and the DLL in there.
With the library and the API ready, it is time to start coding. Of course nothing is that easy. I will talking about other challenges in next post.
This is another post by the utility that I am making, but it uses AtomPub protocol. More update coming soon. UPDATE: Edit post to see if I can tag the post correctly. I missed the tag when I create the post.
UPDATE 2: I am unable to use AtomPub to tag the post. Atom does not support tag natively. I will post more details later.
This post is created using a command line tool that I am building which call the MetaWeblog API available from WordPress.
UPDATE: Now updated with tags!
This post is created by a command line application, but this time it takes a Word 2010 document created by the Blog template in Word 2010.